

Getting started
Entra app registration (classic setup)
The legacy path, where you register your own app, assign the two read-only roles to it, and hold the client secret.
Validated against the Azure portal on 27 July 2026. The role-assignment path was re-walked and captured on 6 August 2026.
Click any image to enlarge.
Three things have to exist in your tenant before the setup wizard can validate anything: an app registration, two role assignments, and a client secret. The wizard’s classic Connect step then asks for four values that come from here.
Infralign reads your Azure estate through this service principal, in your own tenant. You create it, you control it, and you can revoke it. That custody is the point of this path, and its cost, because the client secret’s expiry date becomes yours to watch.
Before you start
Section titled “Before you start”Two checks, in this order. Each one costs a day when it surfaces late.
-
Send the consent request now. Nothing on this page needs a directory-wide admin role. The first sign-in to
app.infralign.aidoes: it raises a one-time consent dialog that only a Global Administrator, Privileged Role Administrator, or Cloud Application Administrator can approve. Their answer can take days, and the wait runs alongside the portal work below. Send your approver the consent URL and the four checks. -
Check that you can assign roles at all. Open Access control (IAM) on the management group or subscription you plan to use, then select Add. If Add role assignment is greyed out, stop and read the warning below. It is the one prerequisite here with no workaround.
The one-time admin consent your tenant grants is for the Infralign sign-in application, which on this path stays a separate identity from the infralign-reader registration you create here. See dashboard sign-in. The roles granted here are the ones set out in the permissions reference.
Create the app registration
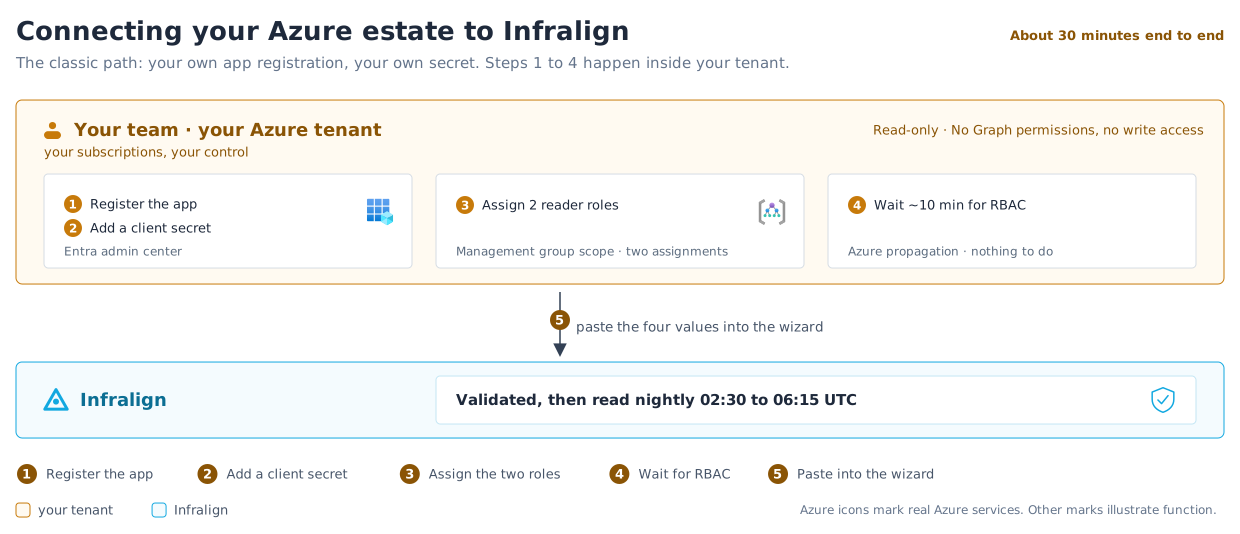
Section titled “Create the app registration”Figure 1 shows who does each step. The steps below are the portal path.
- Sign in to the Microsoft Entra admin center as a user who can register applications.
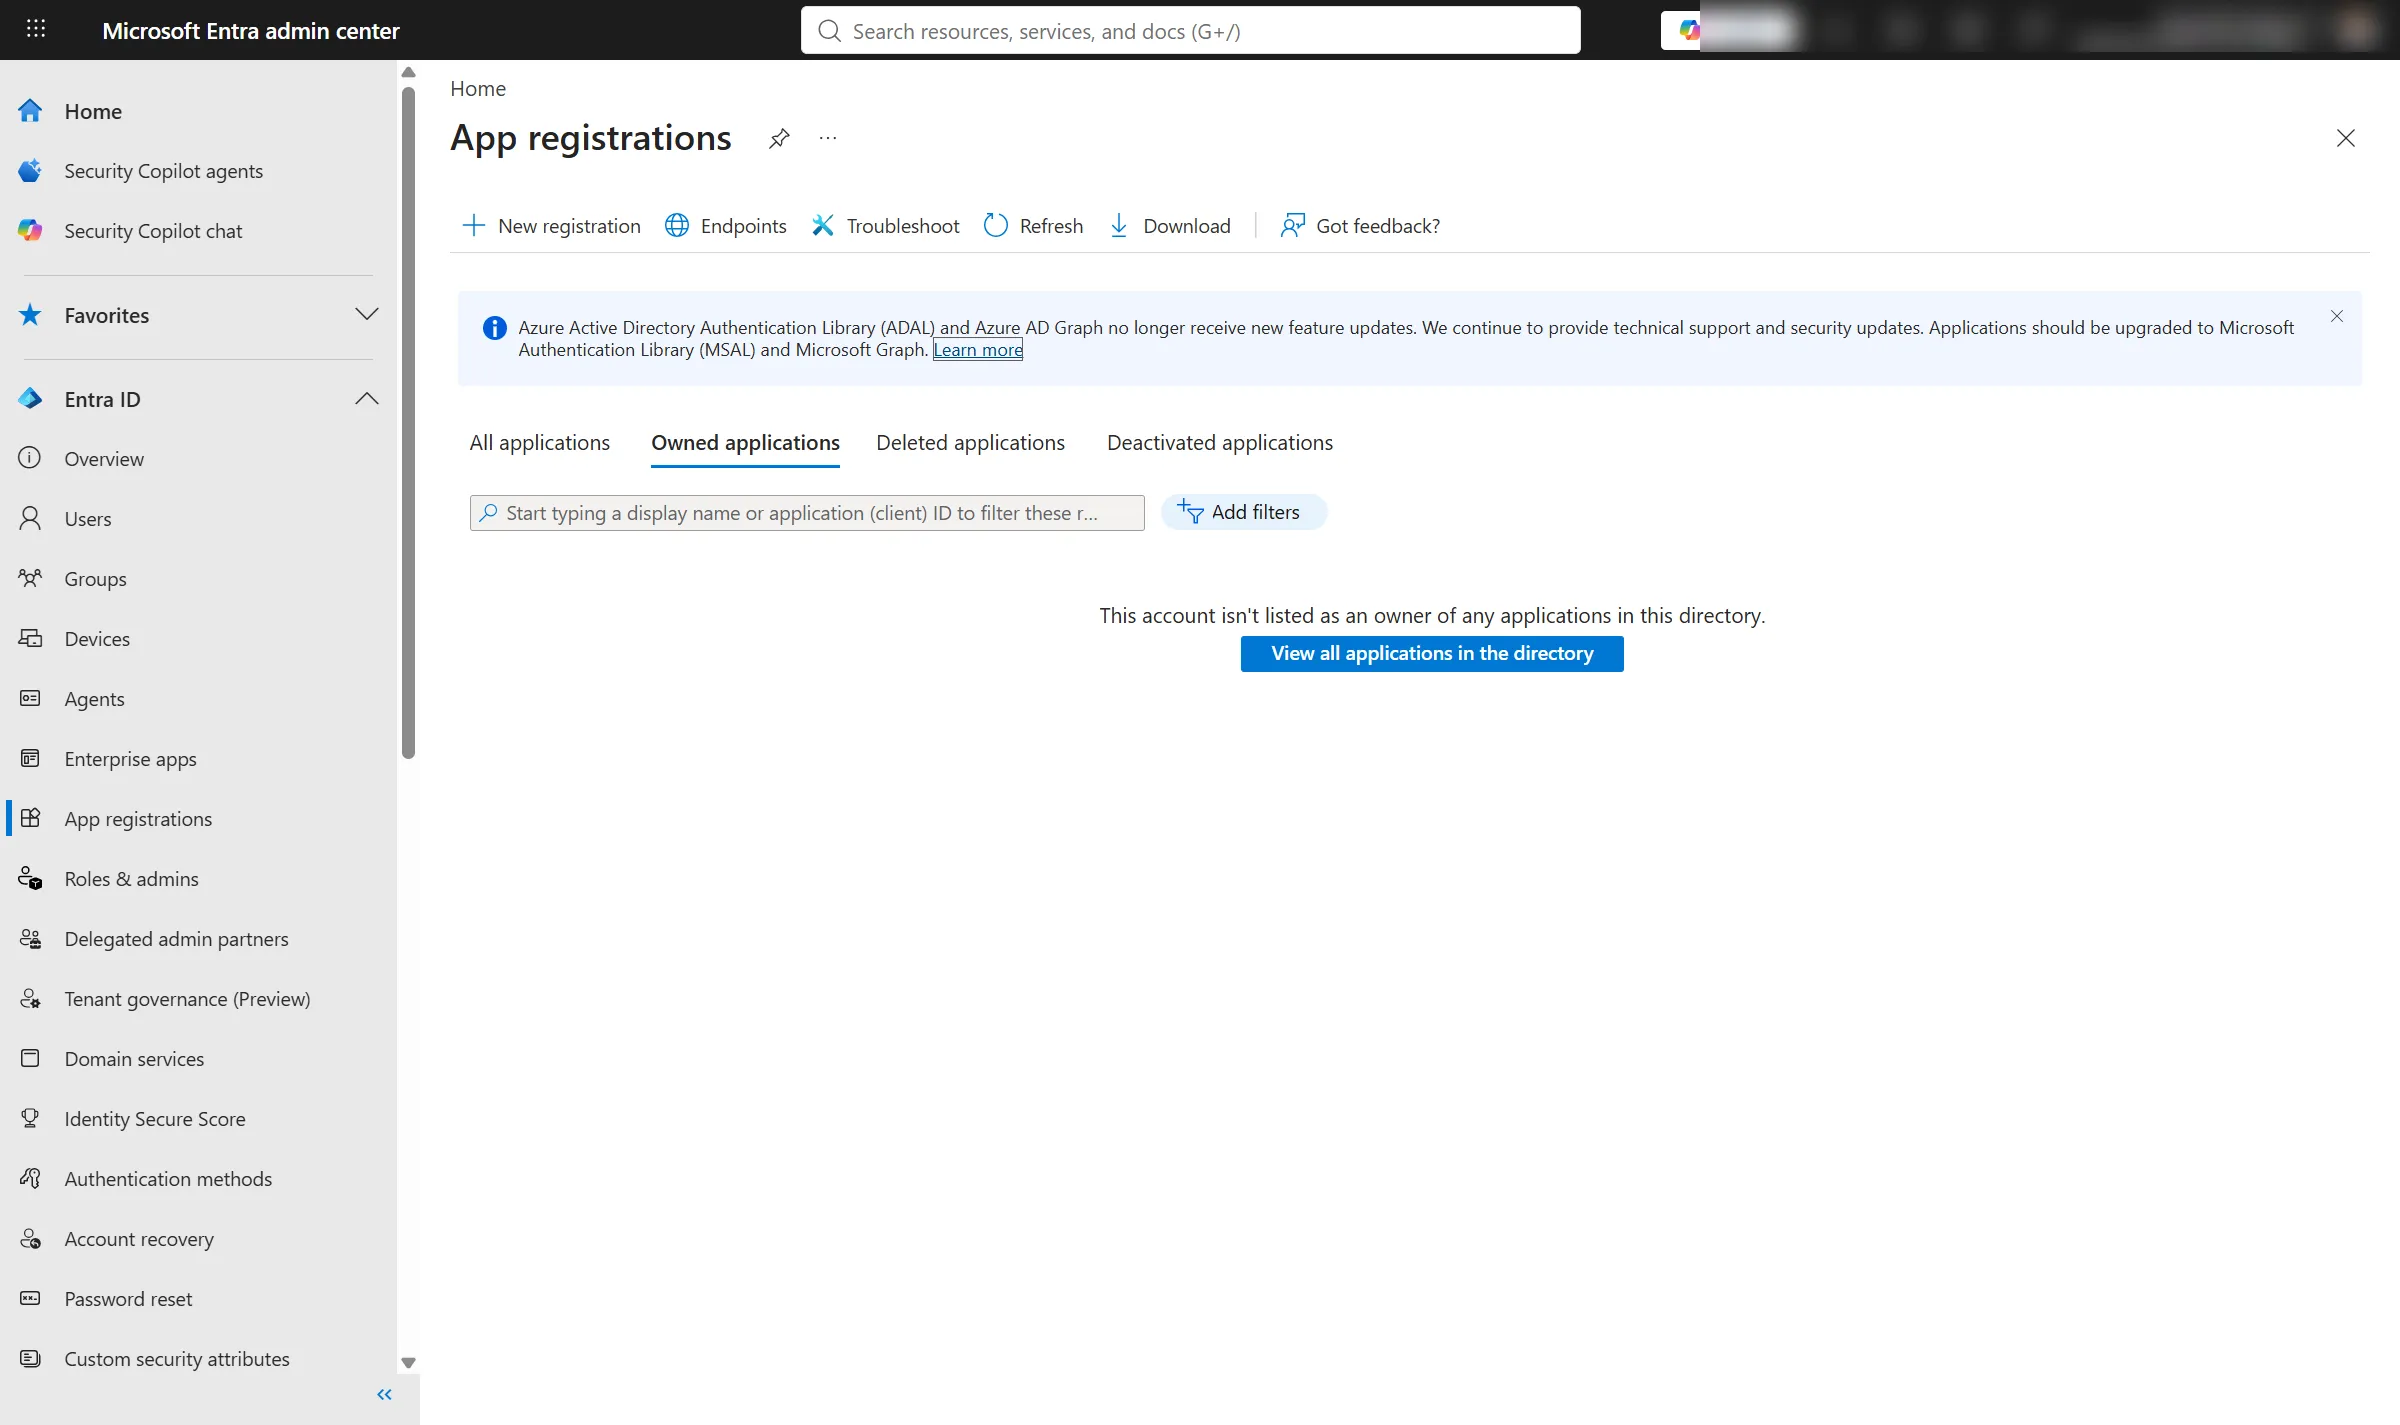
- In the left navigation, expand Entra ID and select App registrations.
- Select New registration.
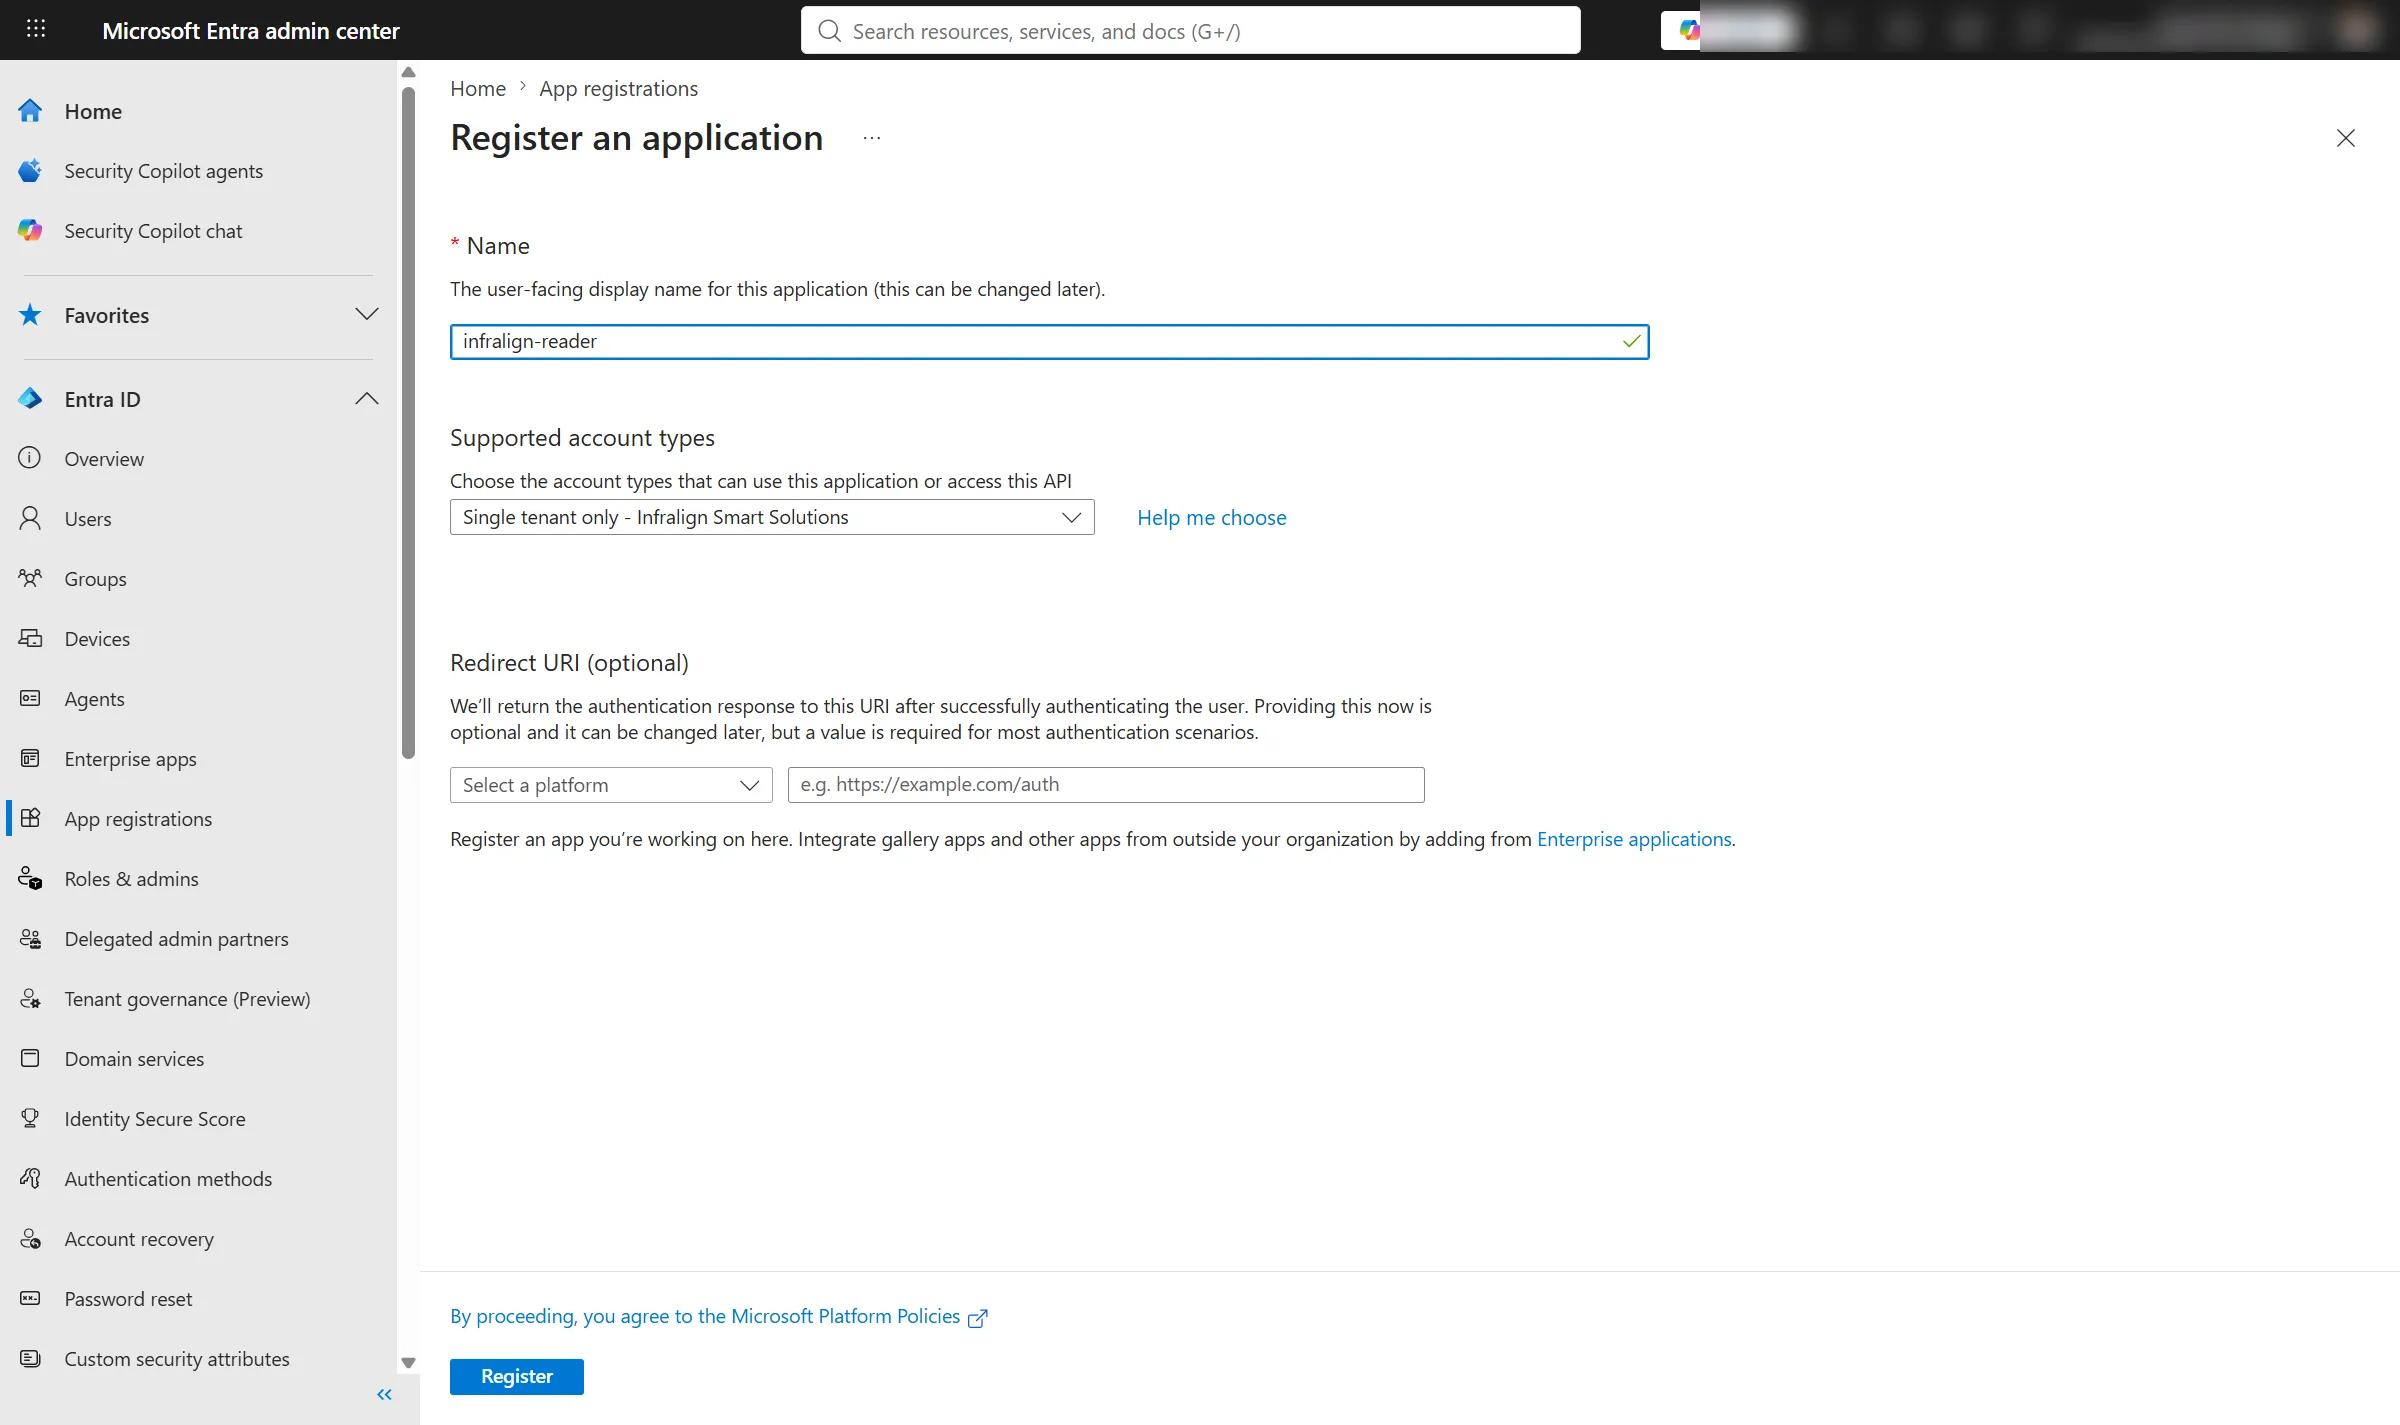
- Enter a recognisable name, such as
infralign-reader. - Under Supported account types, select Accounts in this organisational directory only.
- Leave Redirect URI empty.
- Select Register.
- On Overview, record the Application (client) ID.
- Record the Directory (tenant) ID.
Done when infralign-reader appears under App registrations and you have recorded both IDs.
Steps 8 and 9 both happen on the screen below. Both values sit in the Essentials panel, in the left column: Application (client) ID at the top, and Directory (tenant) ID two rows under it.
The Object ID between them is neither of them, and pasting it into the wizard is the second most common mistake on this path.
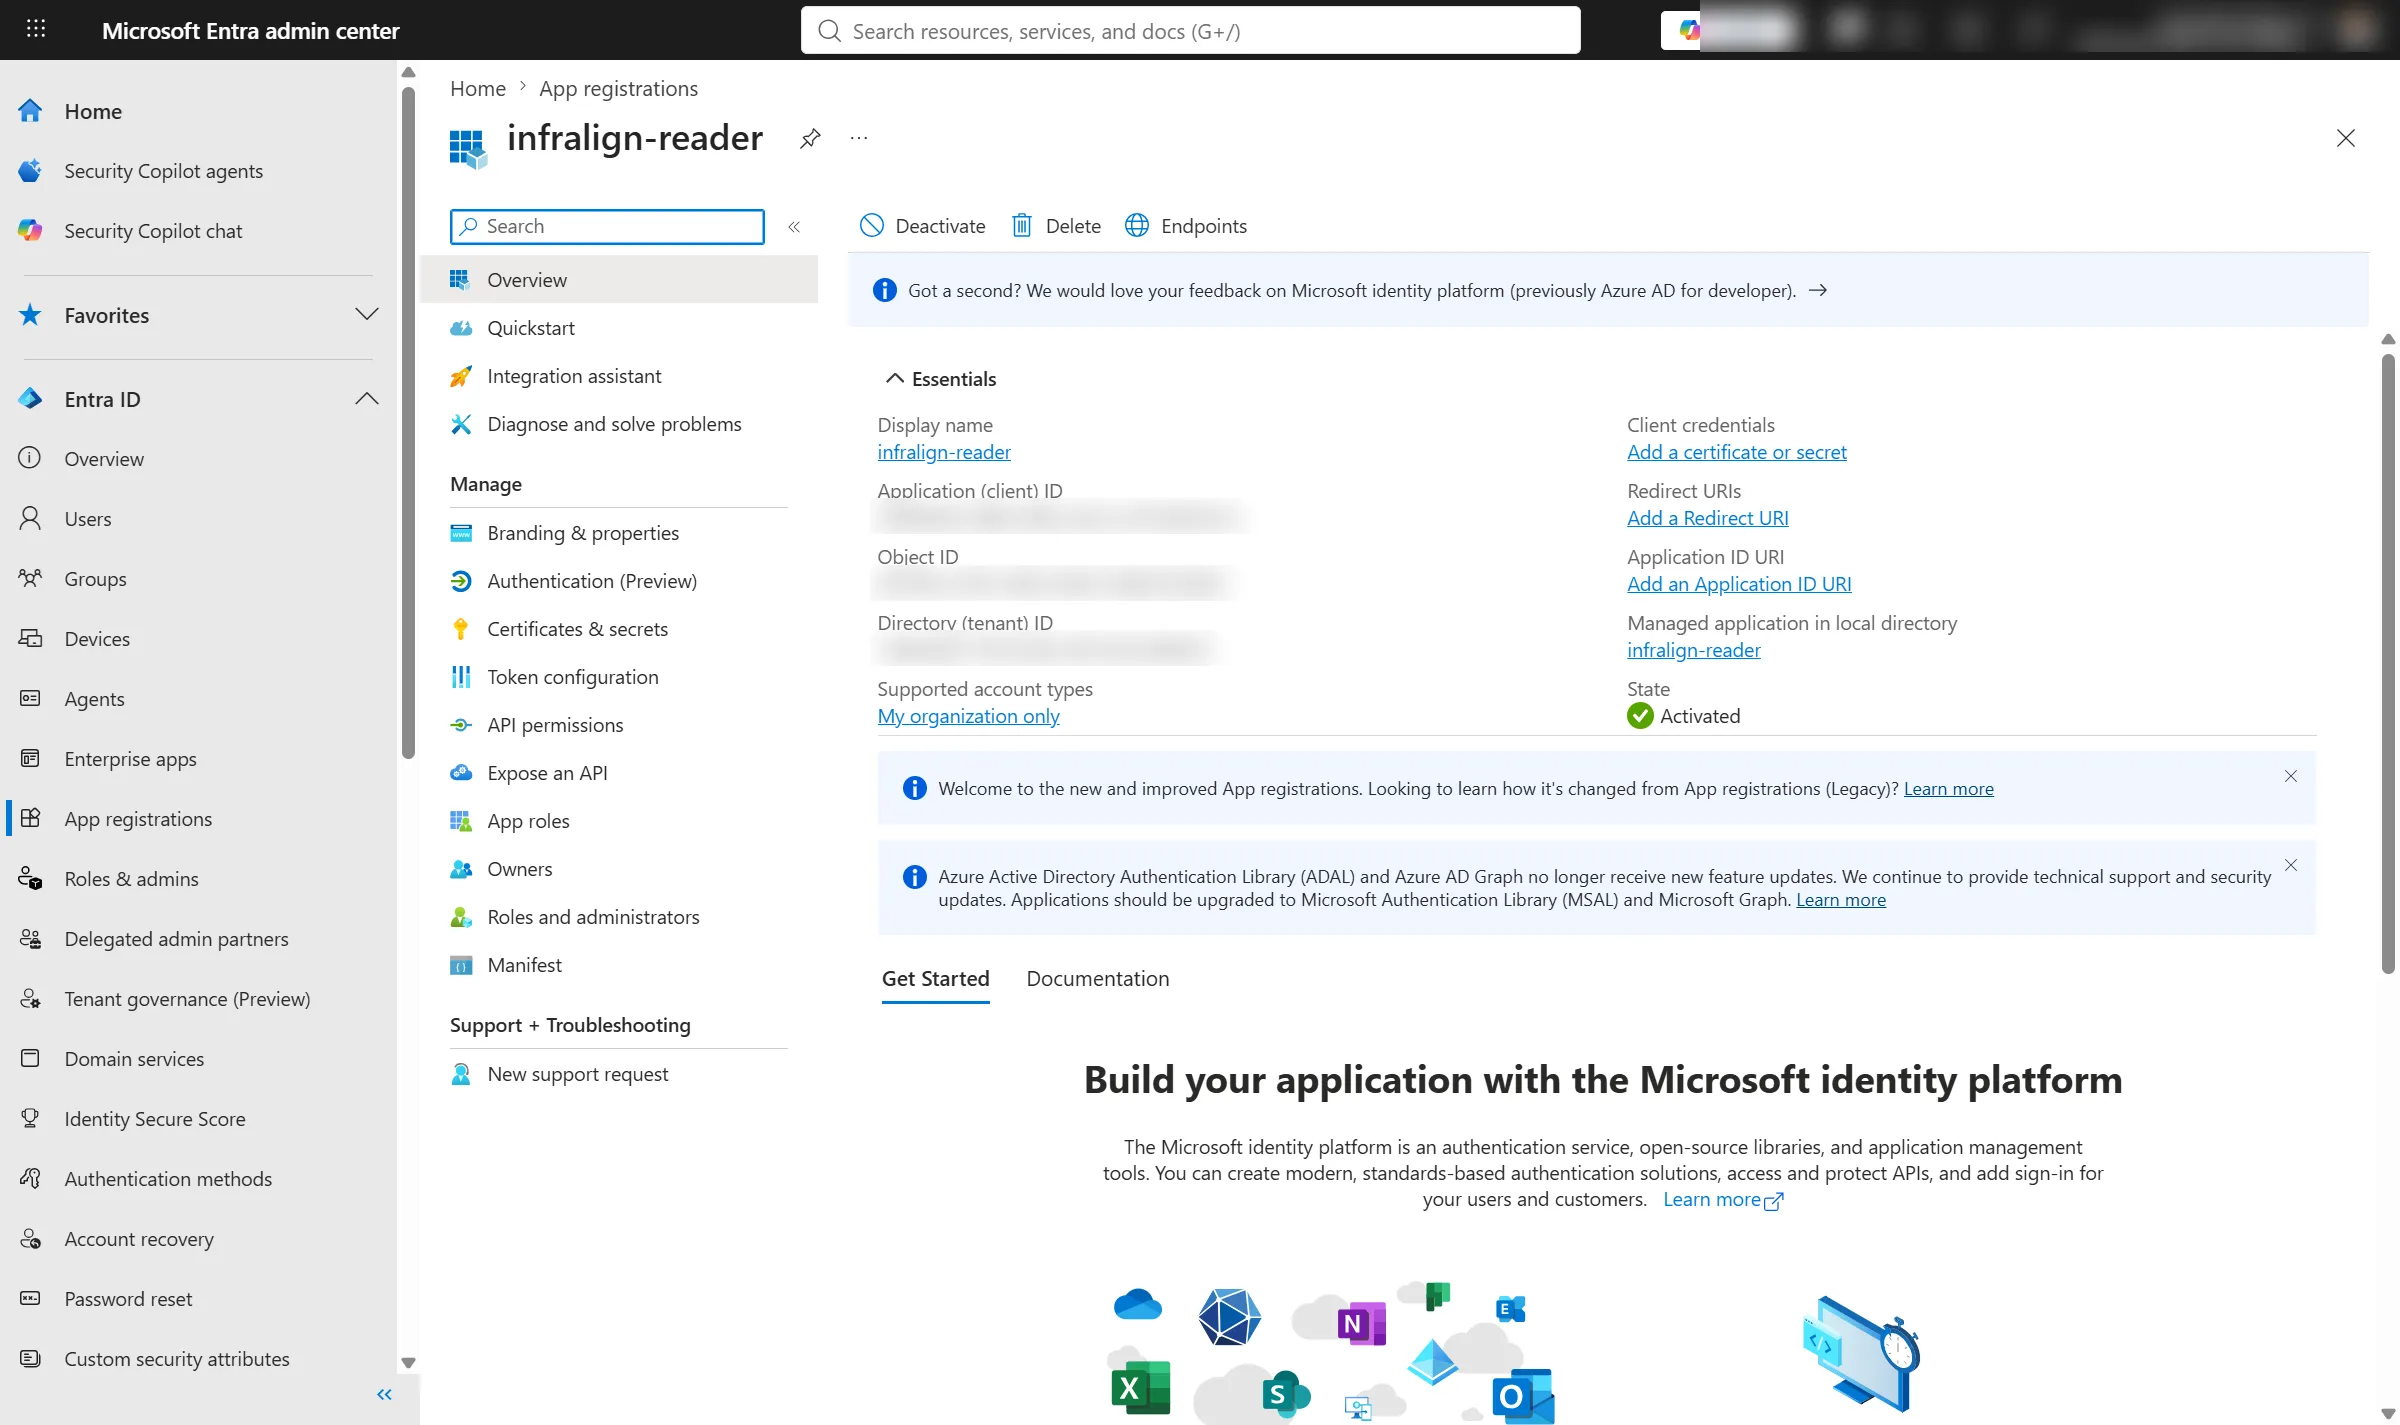
The three identifiers are blurred out of the Overview capture. The field labels and their positions are what the step needs.
Create a client secret
Section titled “Create a client secret”- On the app, open Certificates & secrets → Client secrets.
- Select New client secret.
- Enter a description, such as
infralign. - Select an expiry of 6 or 24 months.
- Select Add.
- Copy the secret Value immediately, not the Secret ID.
- Note the expiry date Entra shows beside it.
Done when you hold the secret value and its expiry date.
Entra shows the value once. Copying the Secret ID instead of the Value is the most common mistake on this path. It surfaces later, as a refused sign-in in the wizard.
If the consent answer may take days, create the secret last. Nothing before the wizard needs it, and you can add a new secret at any time if the value is lost.
The expiry date is one of the four values the wizard asks for. It is what puts an amber badge on the connection page 30 days before the secret lapses. Without it the badge reads “Expiry unknown”.
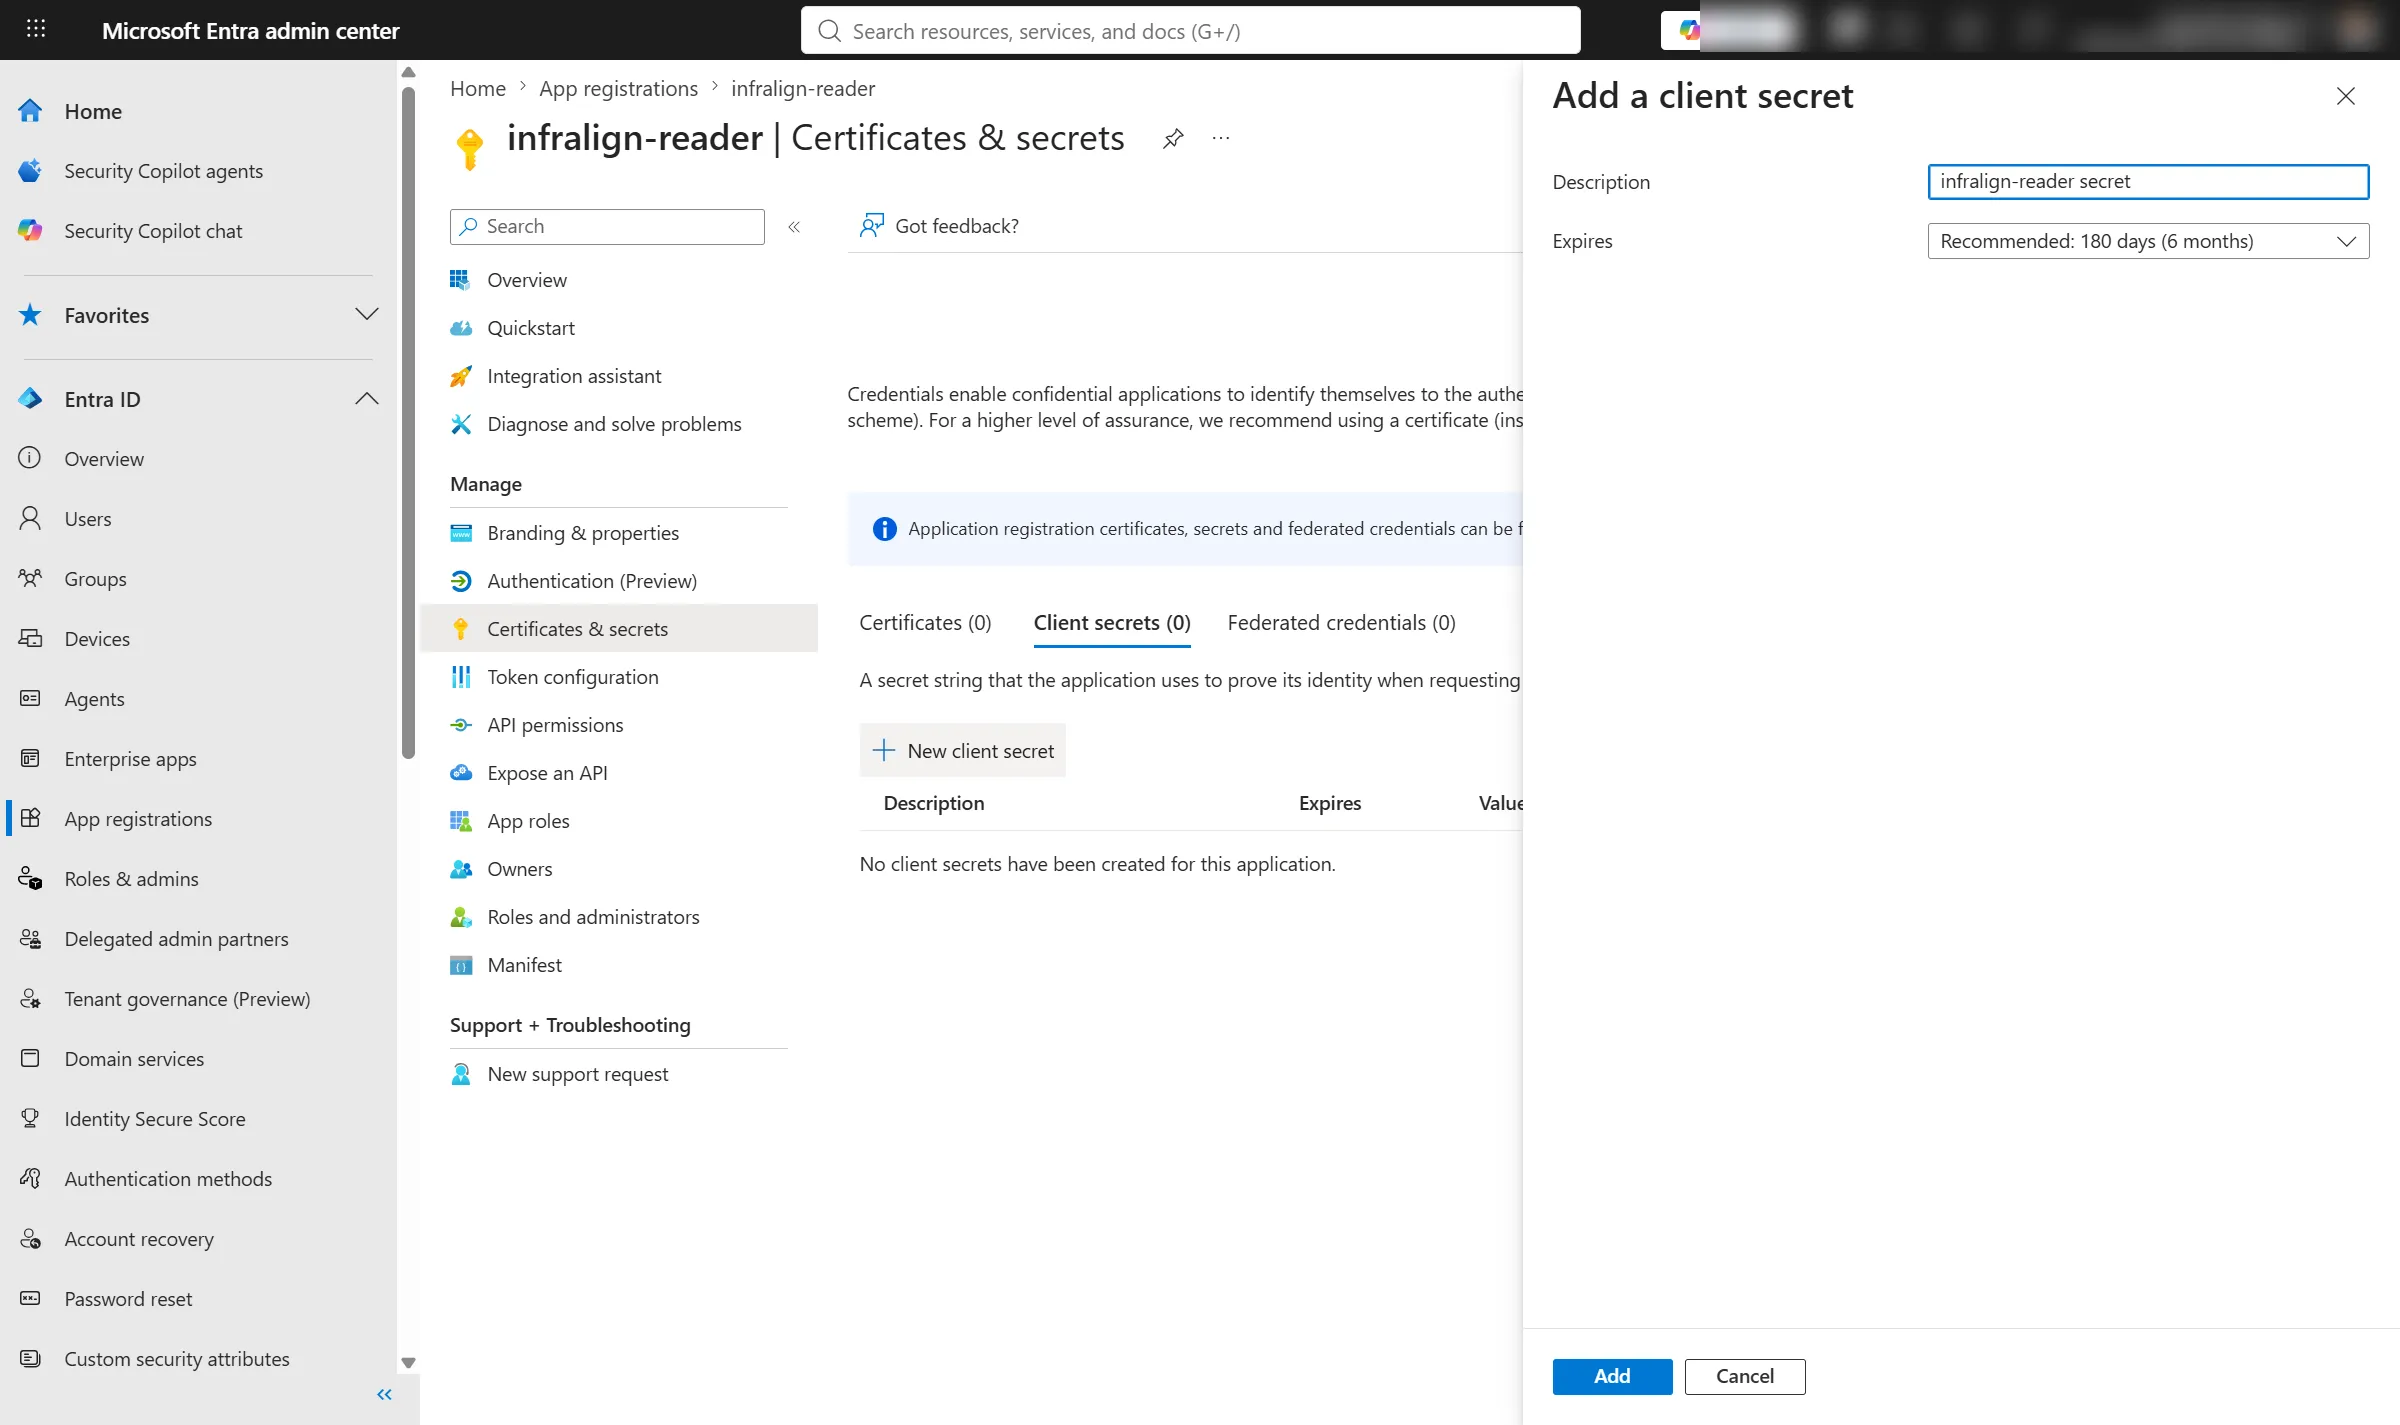
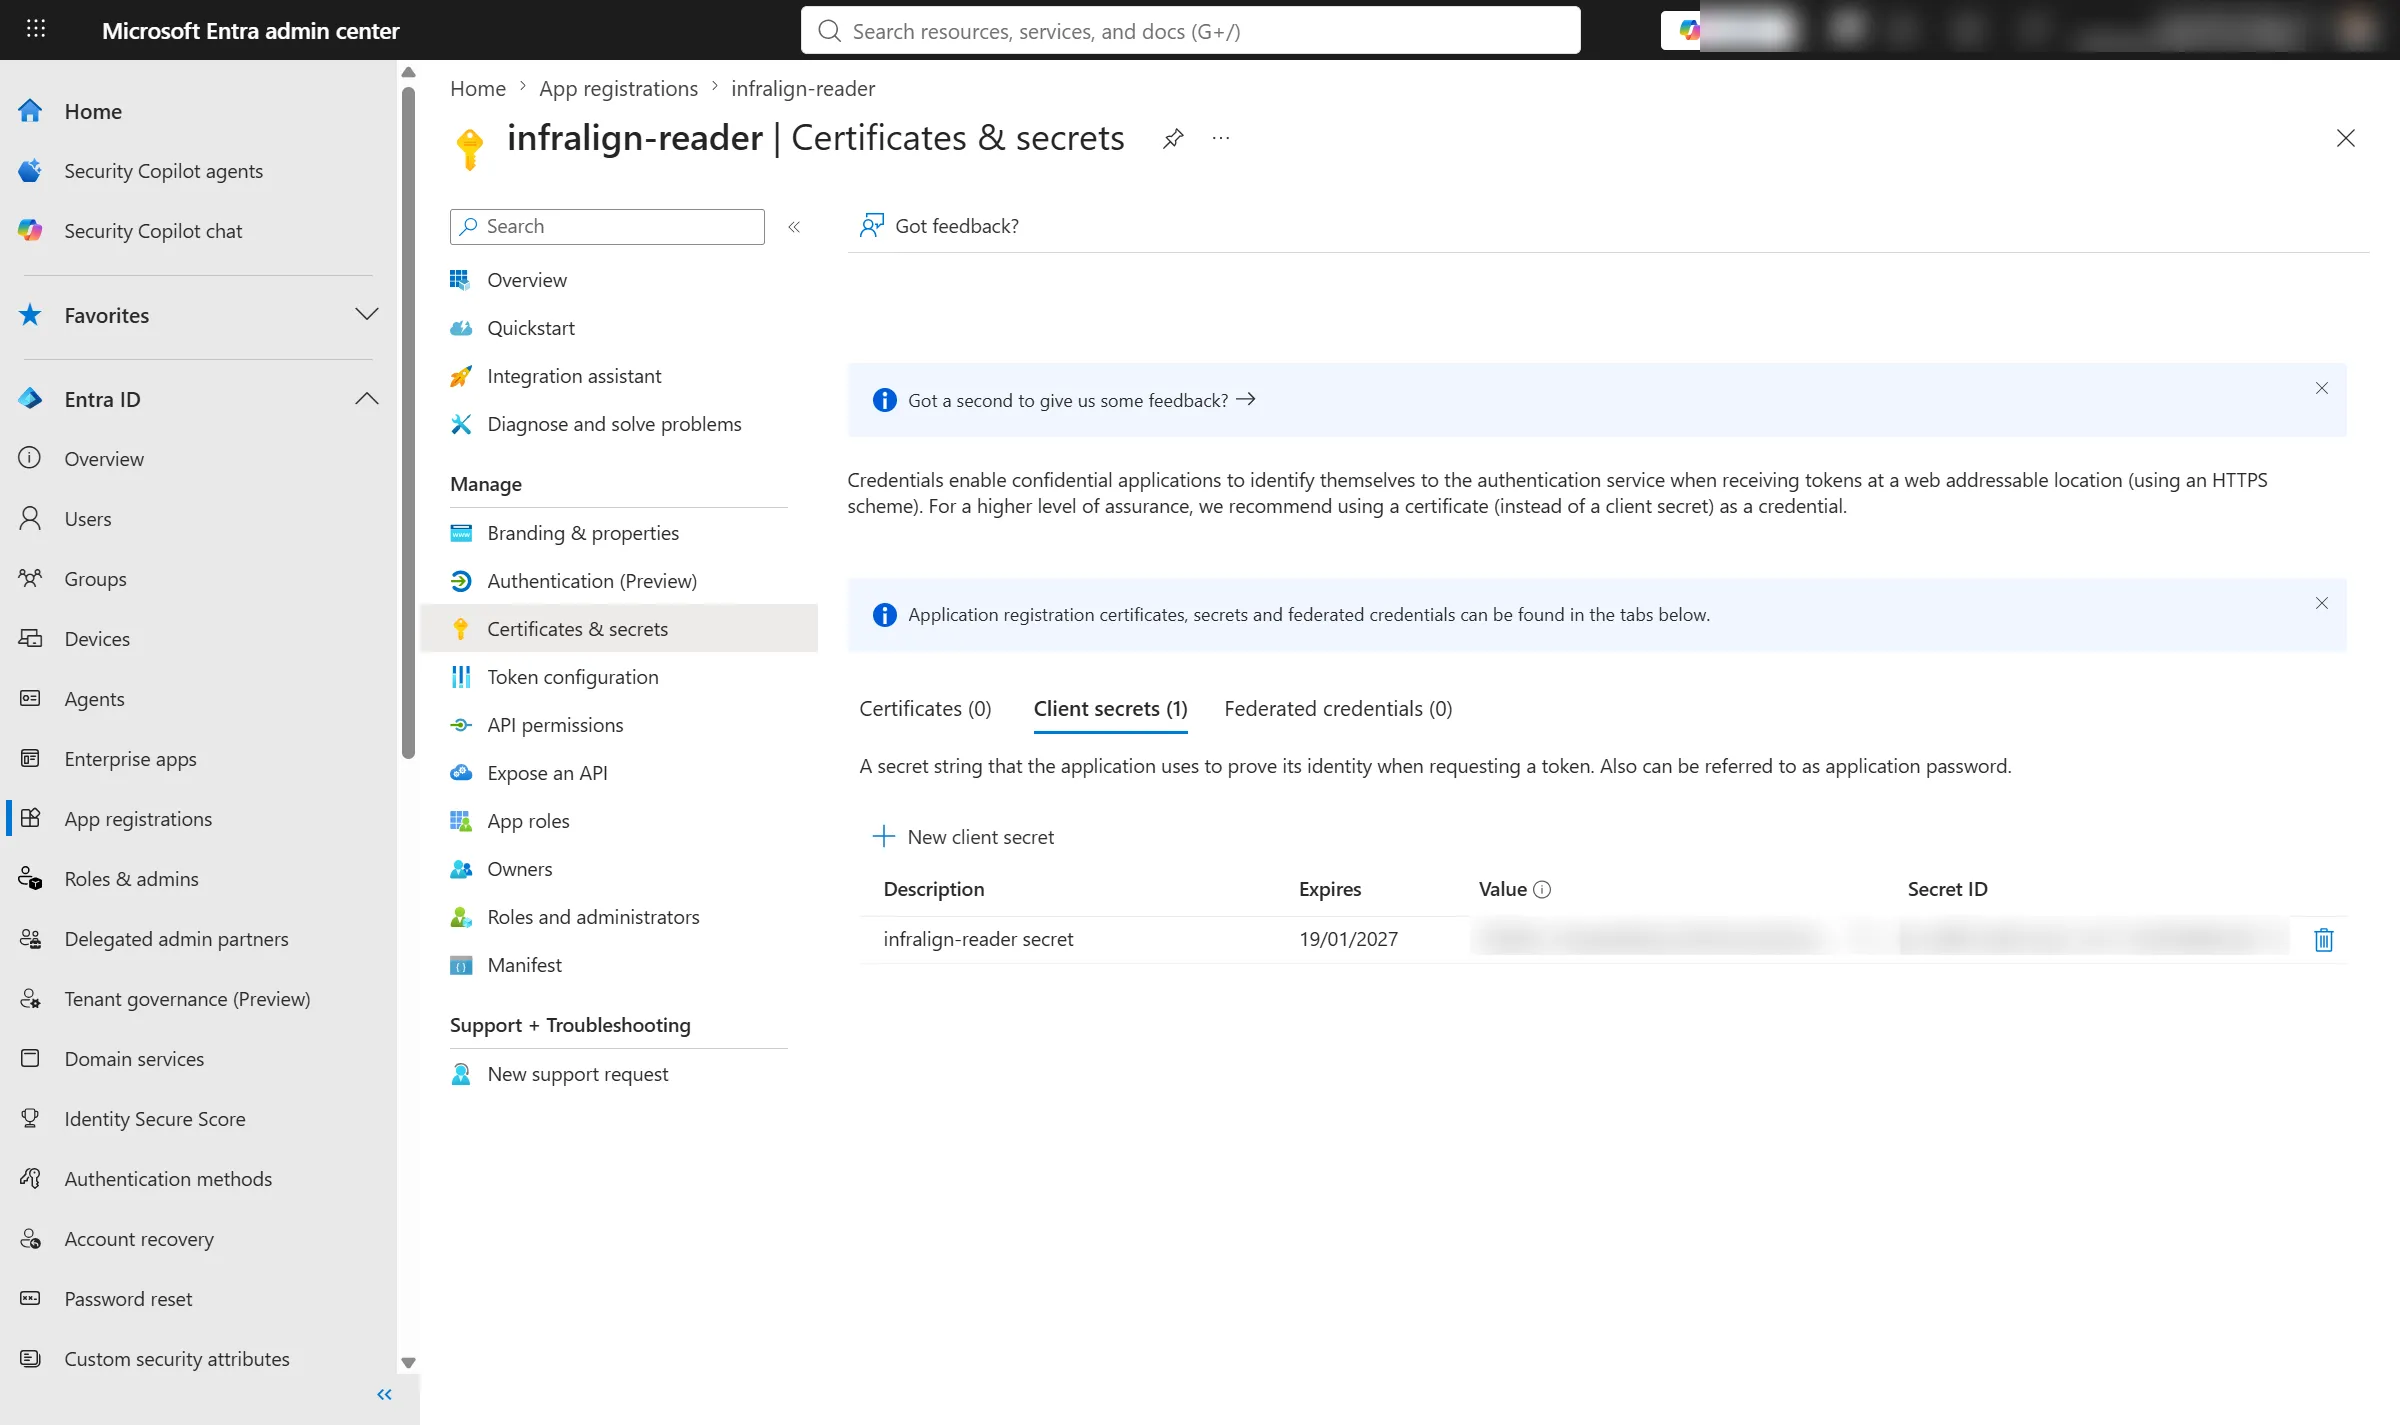
Rotate the secret from the connection page when it approaches expiry. Create the new secret in Entra first, then paste it in: the new value is validated before it replaces the old one, so a failed check changes nothing. See the classic setup section of connect Azure.
Grant the required RBAC roles
Section titled “Grant the required RBAC roles”This is Azure role-based access control, not API permissions.
| Role | Why it is needed |
|---|---|
| Cost Management Reader | The daily lane calls POST …/providers/Microsoft.CostManagement/generateCostDetailsReport. This is an action, so Reader alone returns 403. Cost Management provides the report through signed SAS links; no storage role is needed. |
| Reader | Its */read covers Resource Graph inventory, the Activity Log, Monitor metrics, and Azure Advisor recommendations. |
Choose the scope first
Section titled “Choose the scope first”| Scope | When to use it | Cost |
|---|---|---|
| Management group | You administer a management group covering the subscriptions you want processed | Two assignments for the whole estate, and every subscription created later is covered |
| Subscription | You do not administer a management group | Two assignments per subscription. Allow about a minute each |
Management group scope is the recommendation and the single largest time saving on this page. Two assignments take about six minutes. Twenty subscriptions done one at a time is forty role assignments, and about twenty minutes on top of everything else here.
Do not use billing-account scope.
Reader grants control-plane metadata only. It can see that resources exist and how they are configured, never what is inside them. See why Reader, and what it cannot see.
Assign the roles
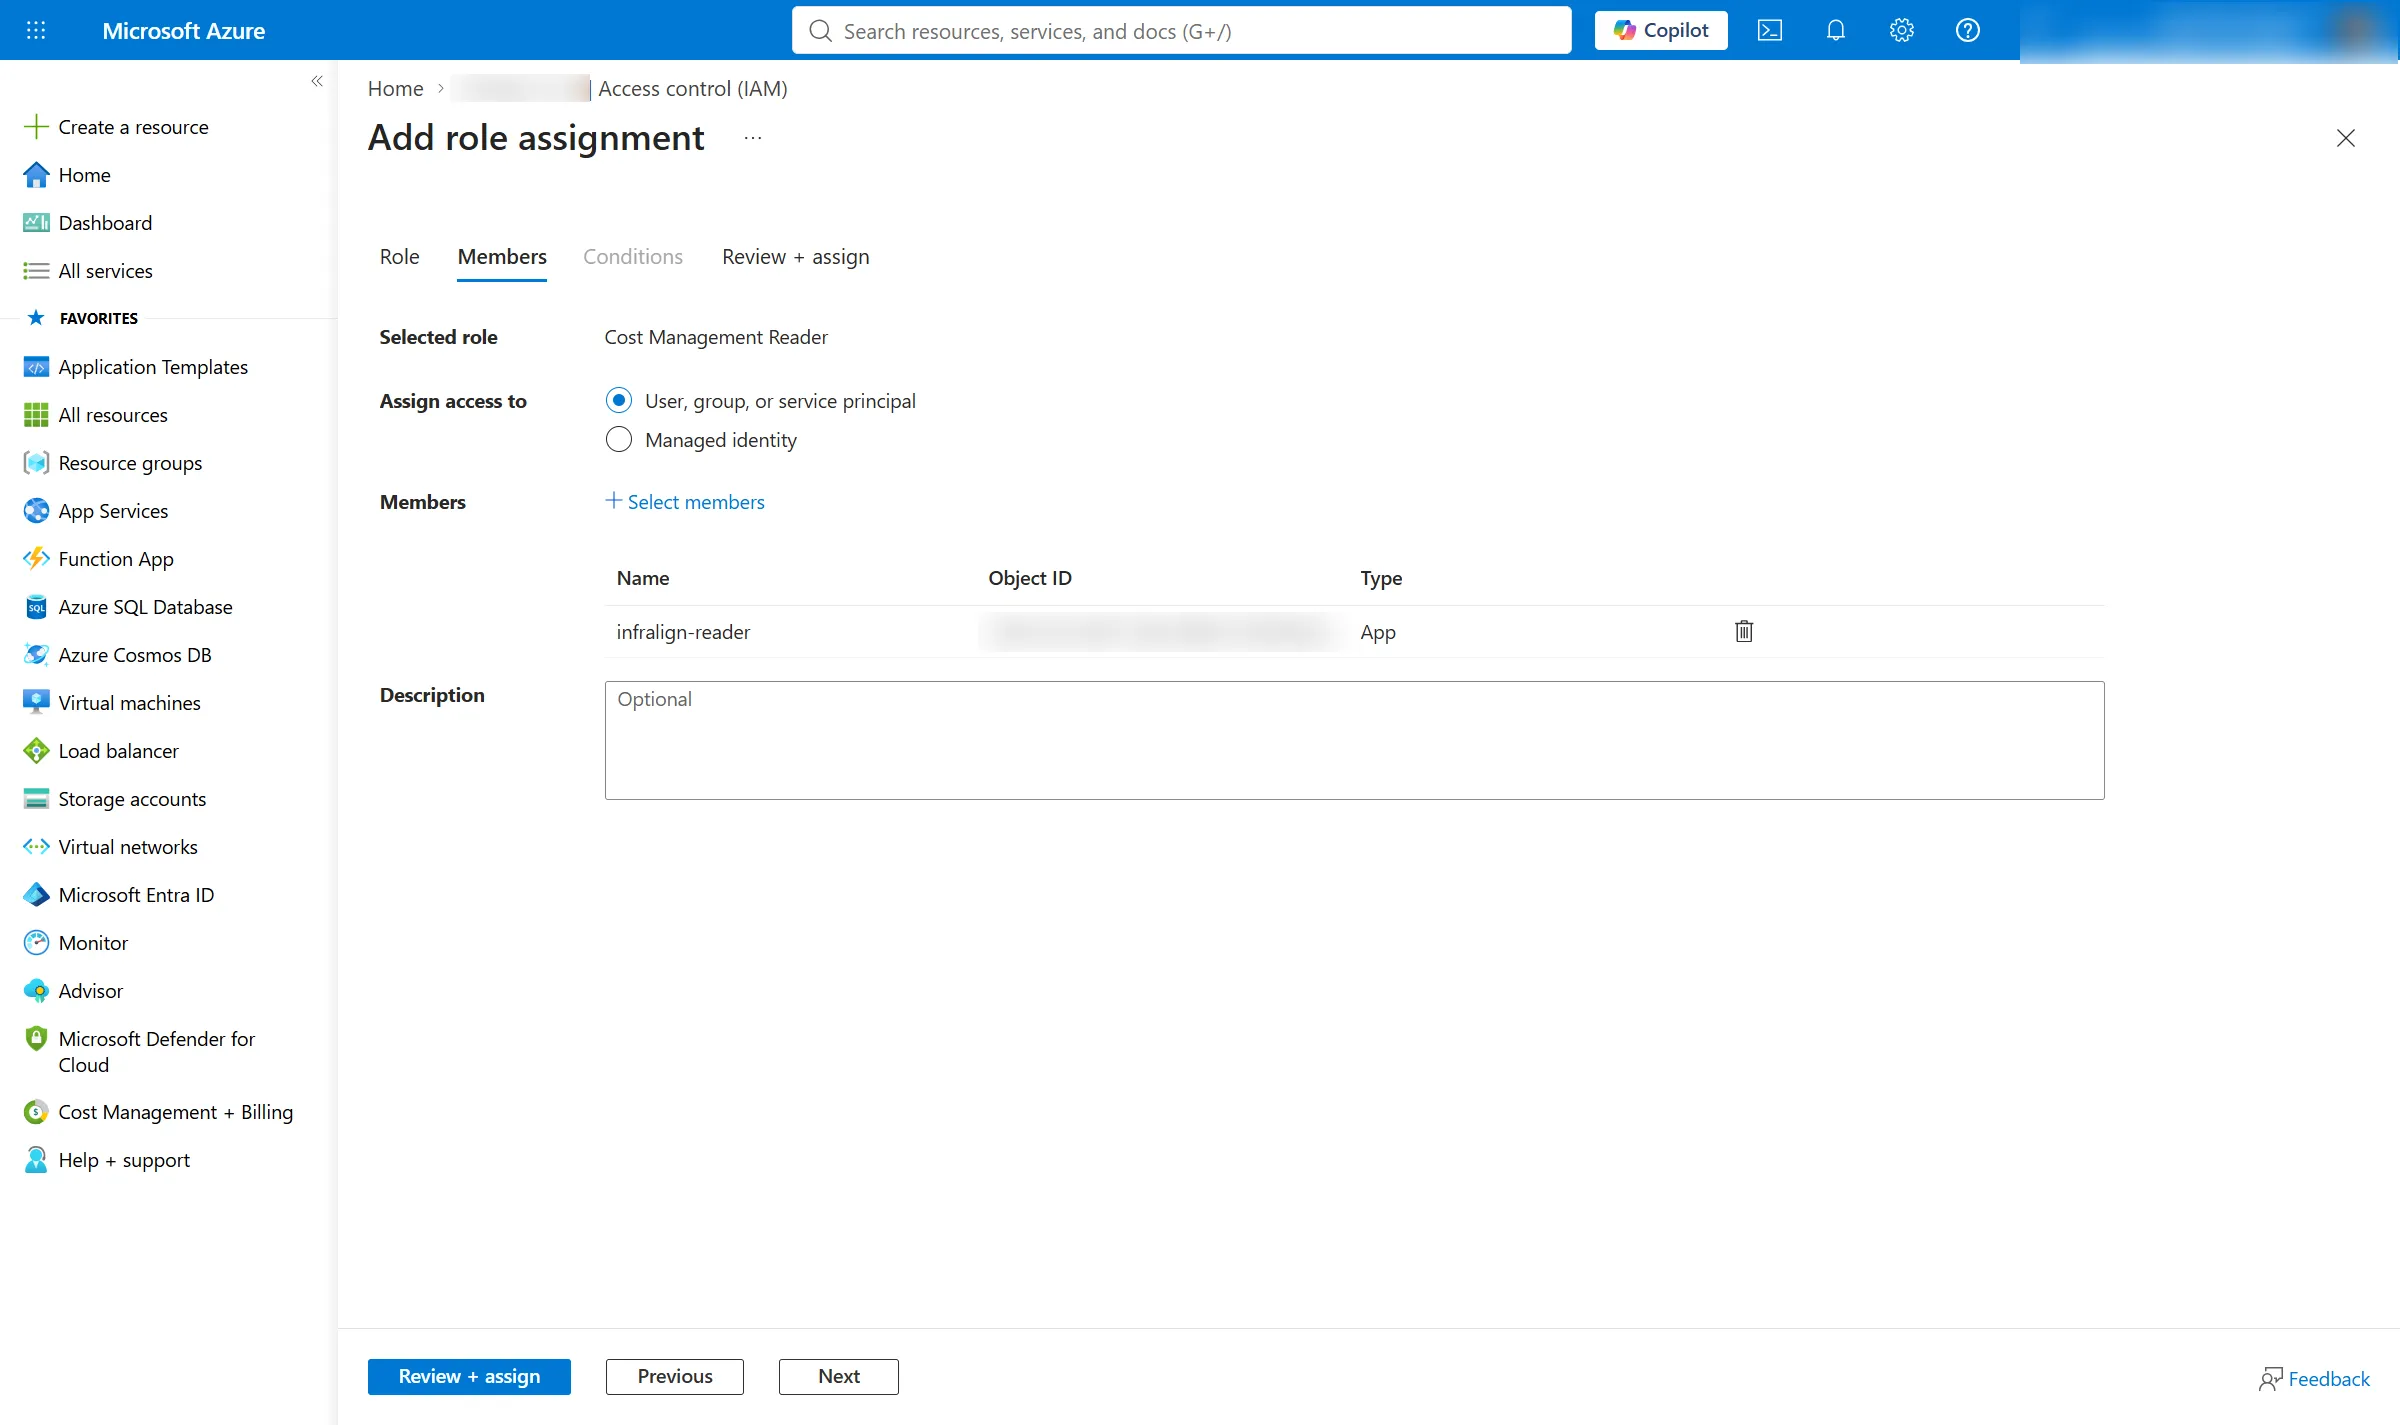
Section titled “Assign the roles”This is the longest click path on the route. The captures below walk it on a subscription; a management group shows the same screens.
-
Open the management group, or the subscription, in the Azure portal.
-
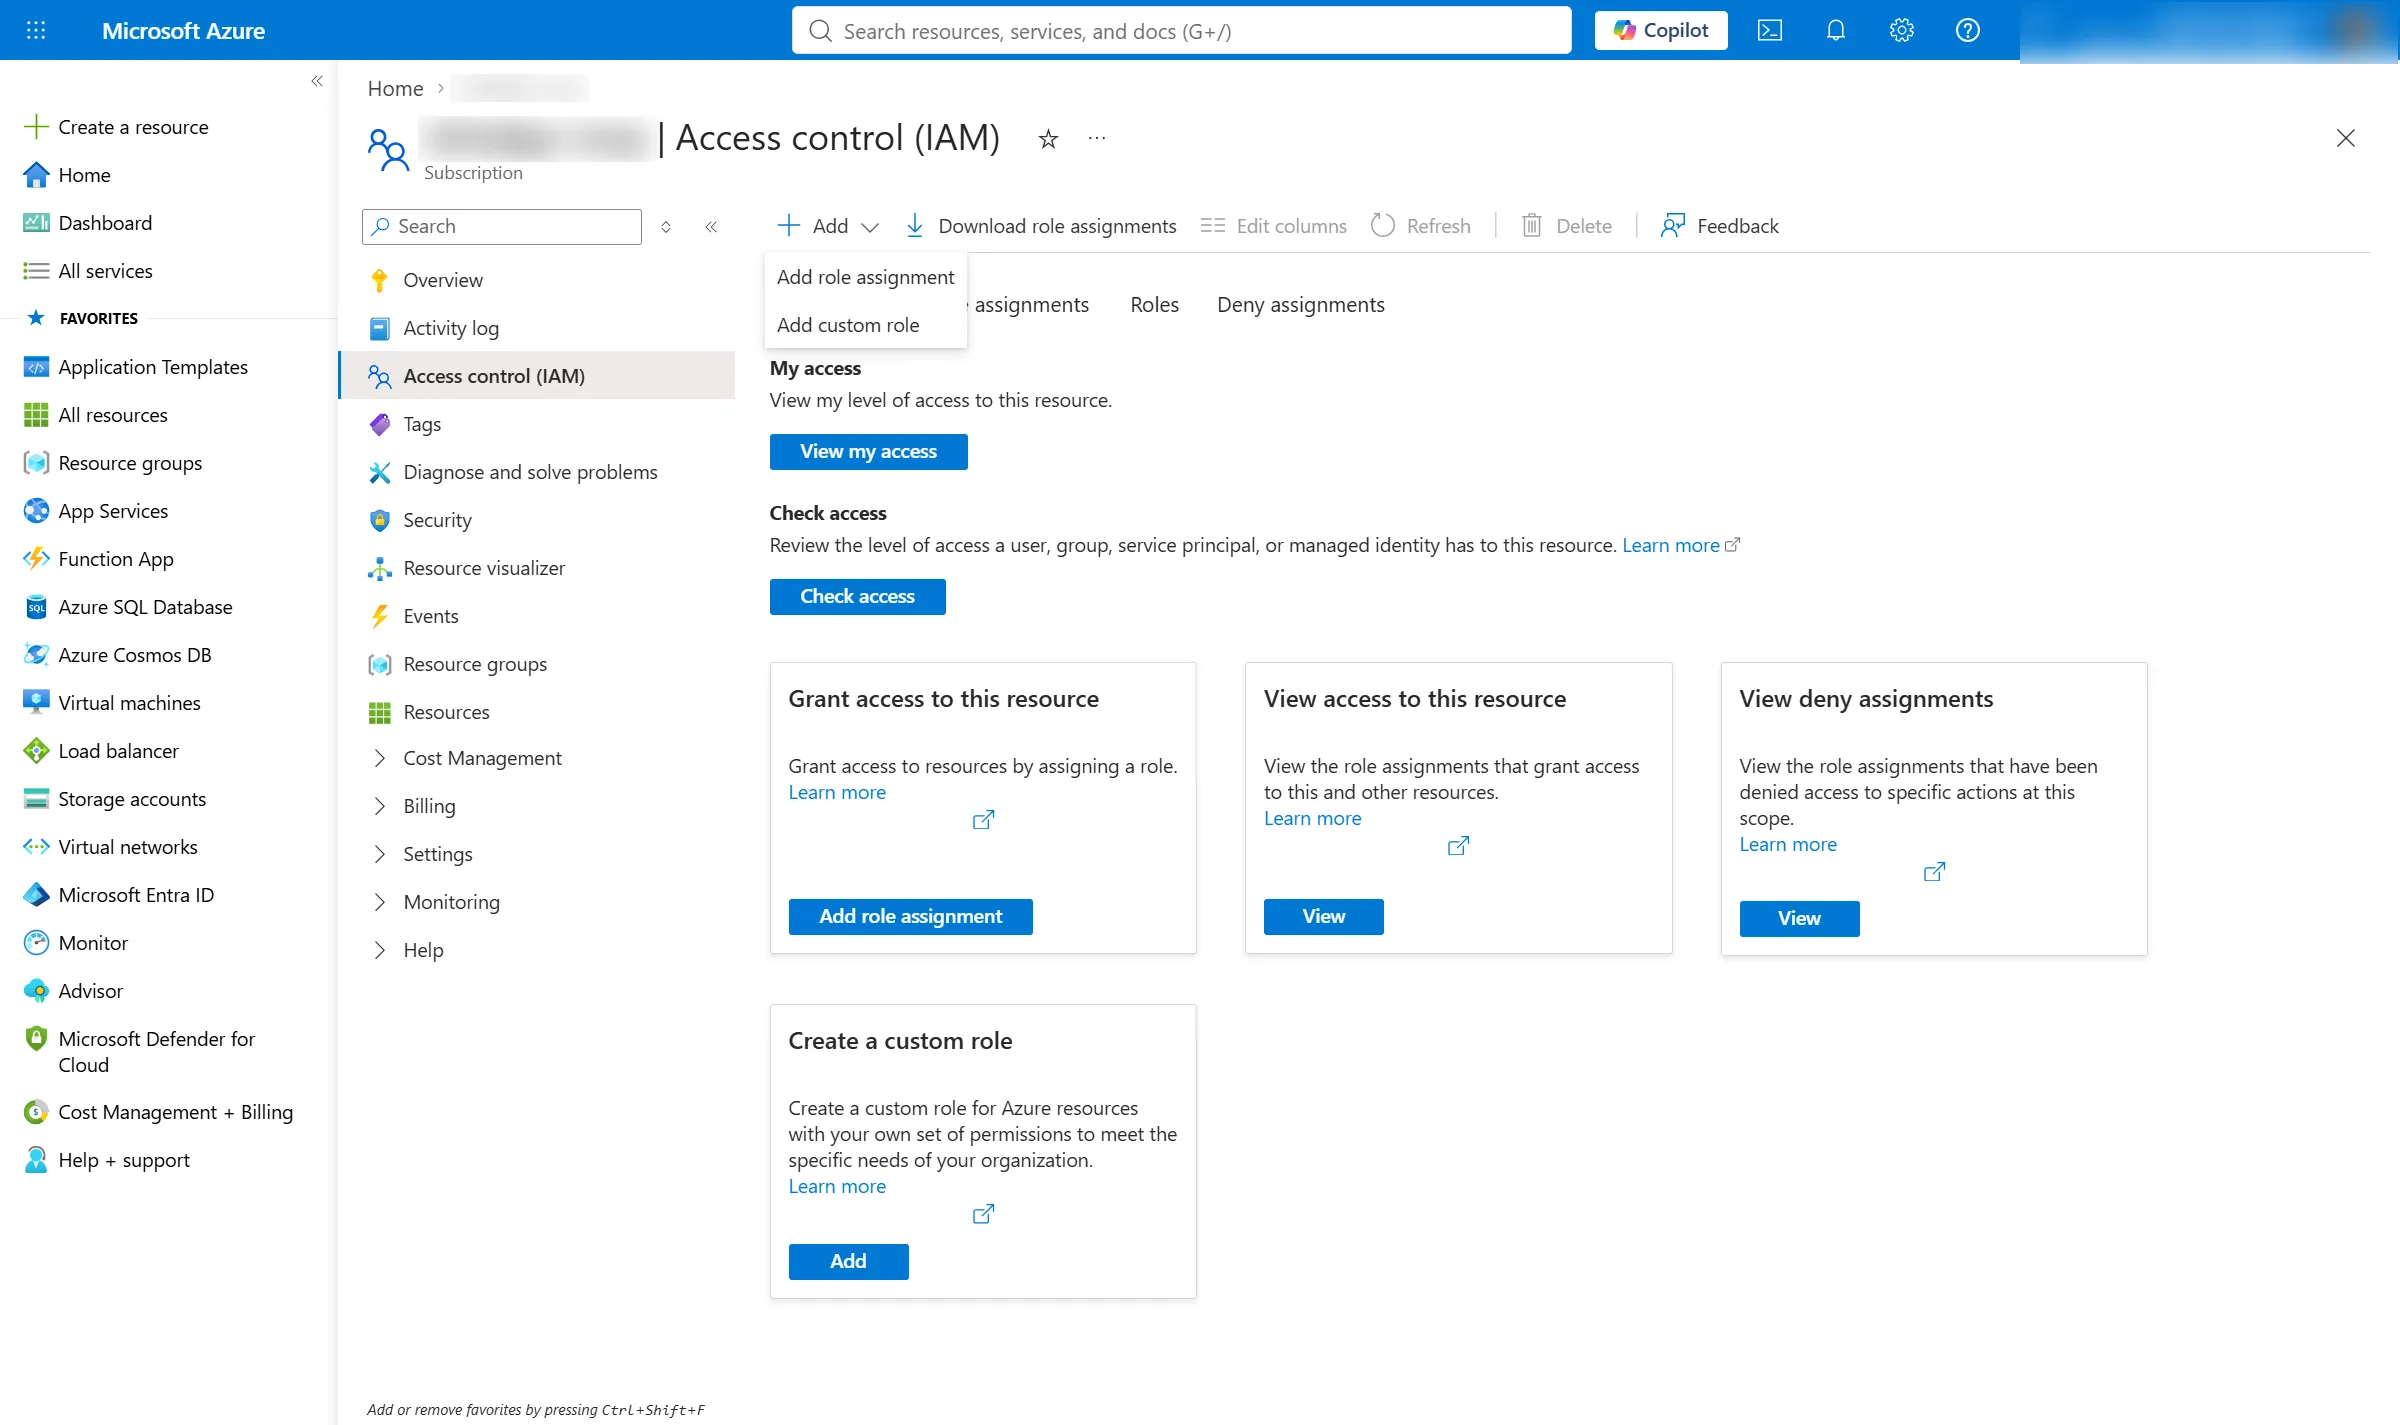
Open Access control (IAM).
-
Select Add → Add role assignment.
Greyed out? Stop here and read the prerequisite check at the top of this page. You are missing Owner or User Access Administrator at this scope, and no other step on this page changes that.
-
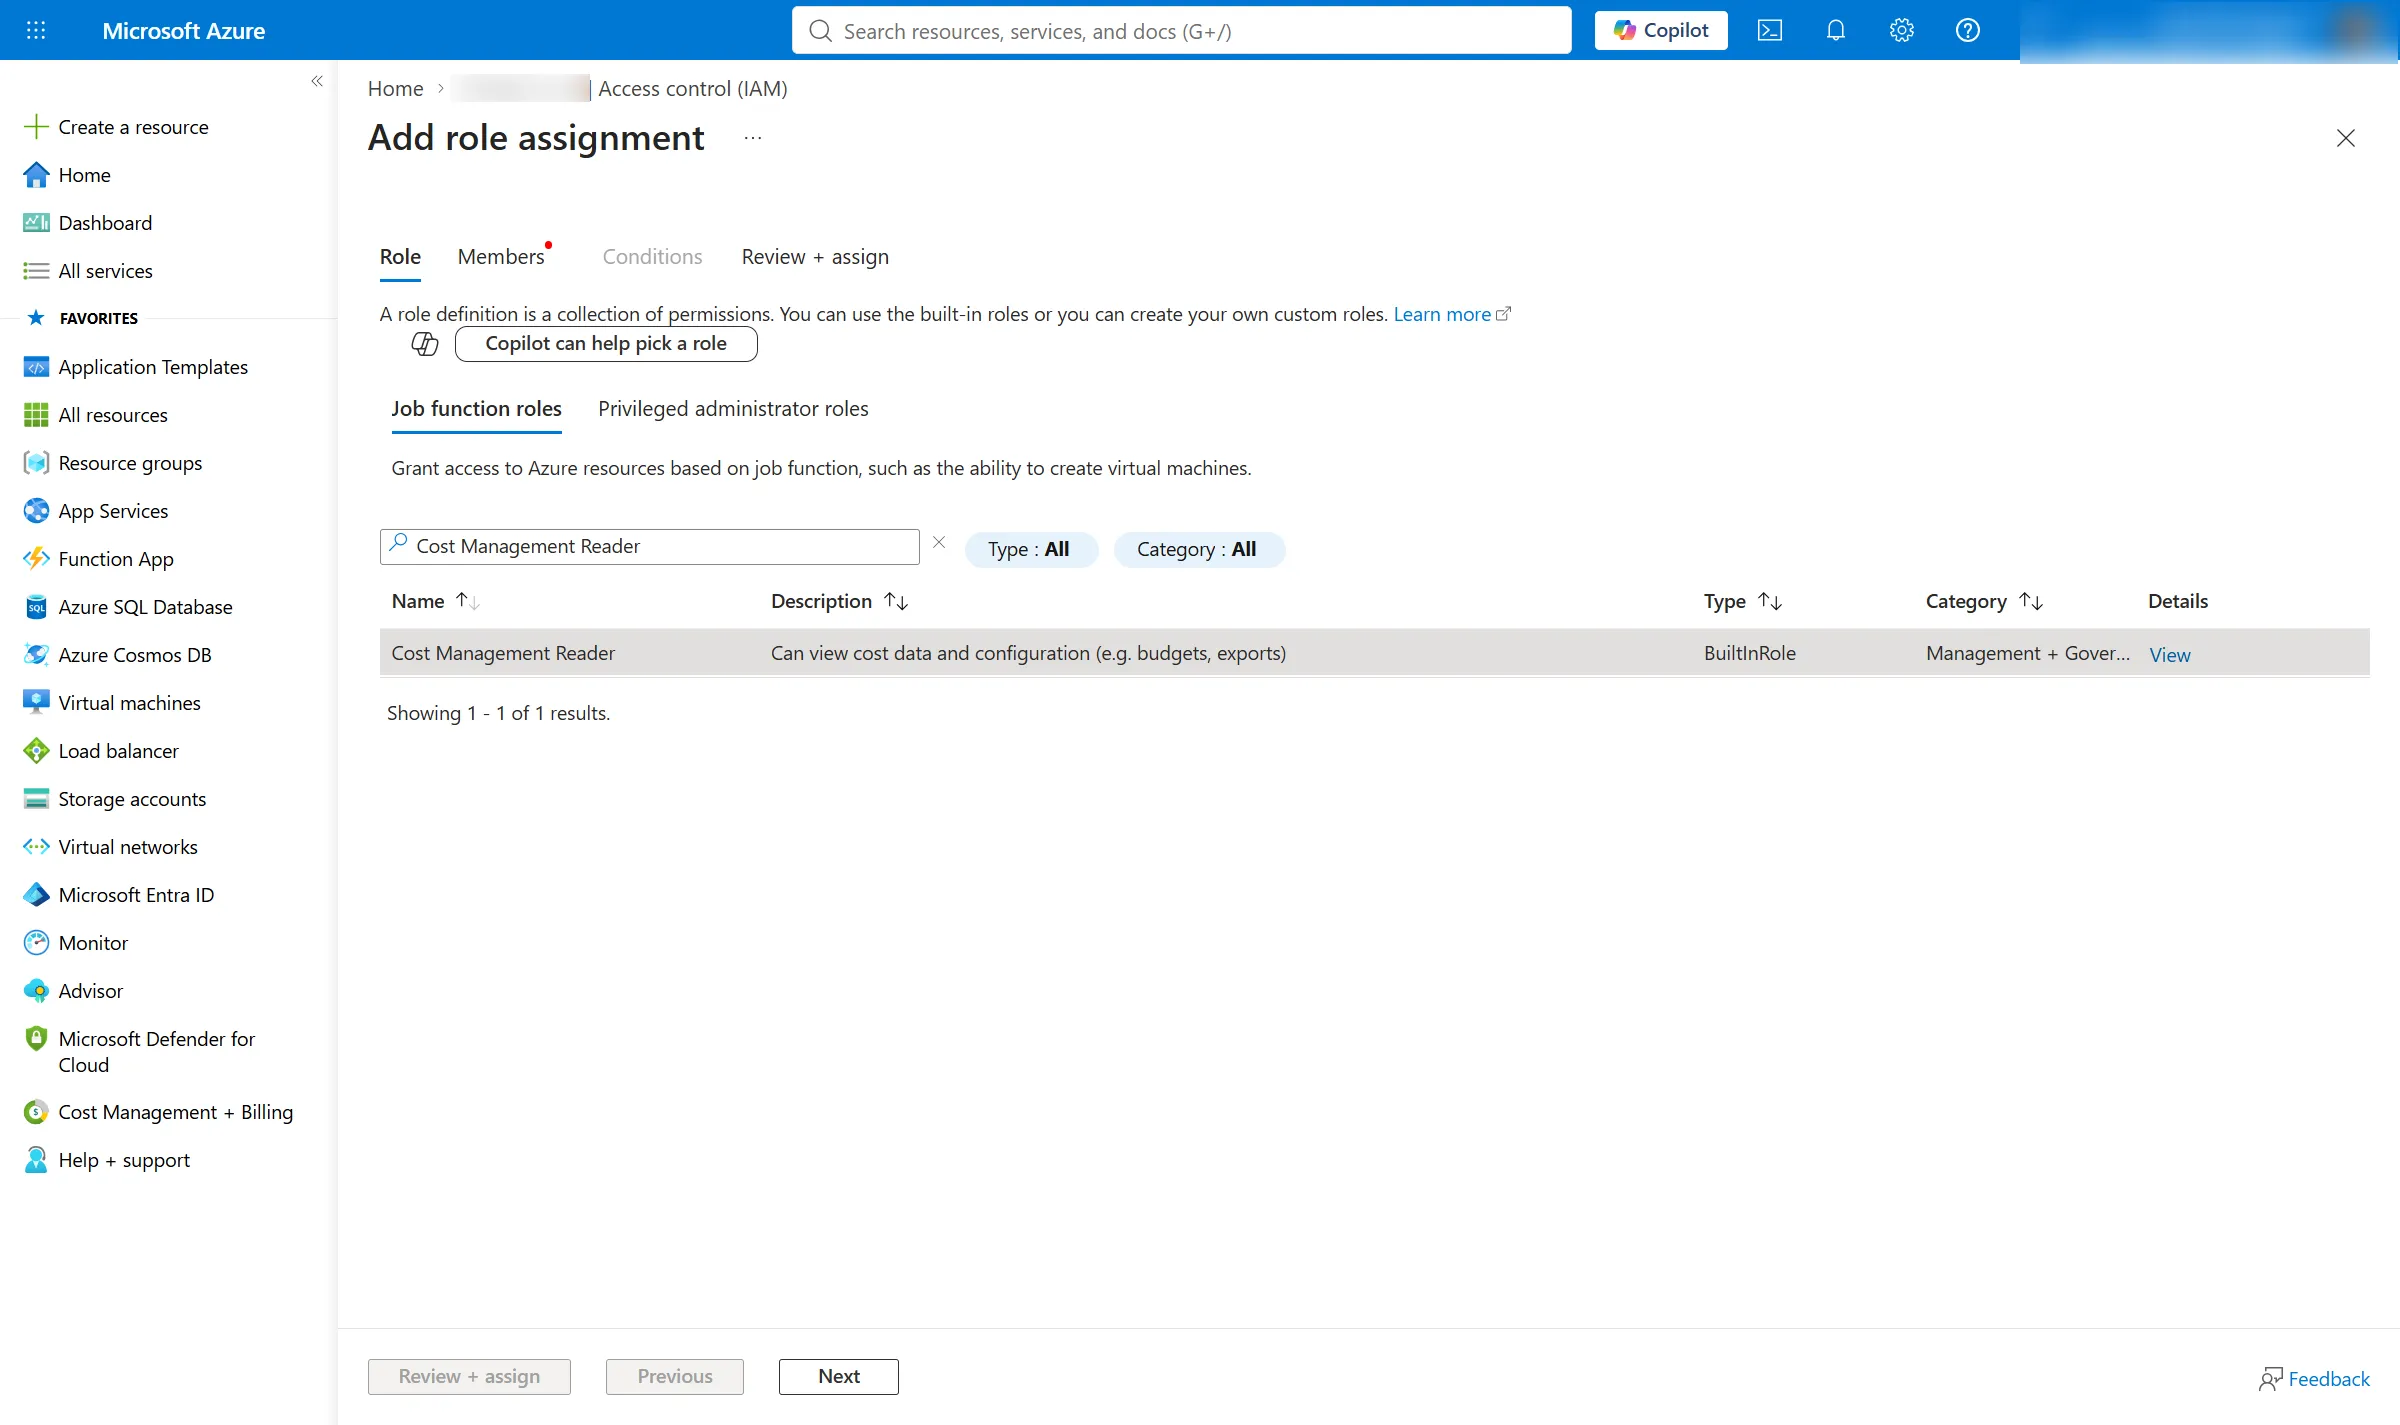
Choose Cost Management Reader.
-
Select Next.
-
On Members, keep User, group, or service principal selected.
-
Select Select members.
-
Search for
infralign-reader. -
Select the app.
-
Select Review + assign.
-
Repeat steps 3 to 10 for Reader.
Captured 6 August 2026 from a real subscription. The subscription name, the signed-in identity and the object ID are blurred.
If you assign at subscription scope, repeat the whole procedure for every subscription you include.
Done when infralign-reader holds both roles at the scope you chose.
What each role unlocks
Section titled “What each role unlocks”Cost Management Reader unlocks one thing: the Cost Details report action. That is the daily cost lane, and the dashboards, reports, and audit baselines built on it. Without it the report action returns 403 and no spend data arrives at all.
Reader unlocks the four other Azure sources: Resource Graph inventory, the Activity Log, Monitor metrics, and Azure Advisor. Those are the context that turns a charge into a finding. Without Reader on a subscription, cost still arrives but the subscription itself is invisible to discovery, so in practice nothing arrives either.
The endpoint-by-endpoint version, with api-versions and what breaks without each source, is the data sources reference. That is the table to attach to a firewall change record.
What happens next
Section titled “What happens next”Open the setup wizard, choose the classic setup, and paste in the four values: the Directory (tenant) ID, the Application (client) ID, the client secret Value, and the secret’s expiry date. The wizard signs in as infralign-reader, checks both roles on every subscription it can see, and reads one day of cost data. It stores nothing until you confirm.
The wizard’s classic Connect step, its credential custody, and the expiry administration are described in connect Azure.
To prove the access from your own shell, or to keep the commands for a change record, use the CLI validation runbook.
To revoke access, delete the role assignments or the app registration. The nightly run stops reading when Azure enforces the change after propagation.
The service principal above is for ingestion only. Your own users sign in to the dashboards through the multi-tenant Infralign sign-in application, with their existing Microsoft work account.
Next: the classic Connect step, with the four values from this page.