

Getting started
Onboarding checklist
The seven steps in an order you can actually execute, who does each one, and where your part ends. You create no app and hold no secret on the default path.
Infralign enrols your first admin and emails the setup link before any of this. Before you start covers that part.
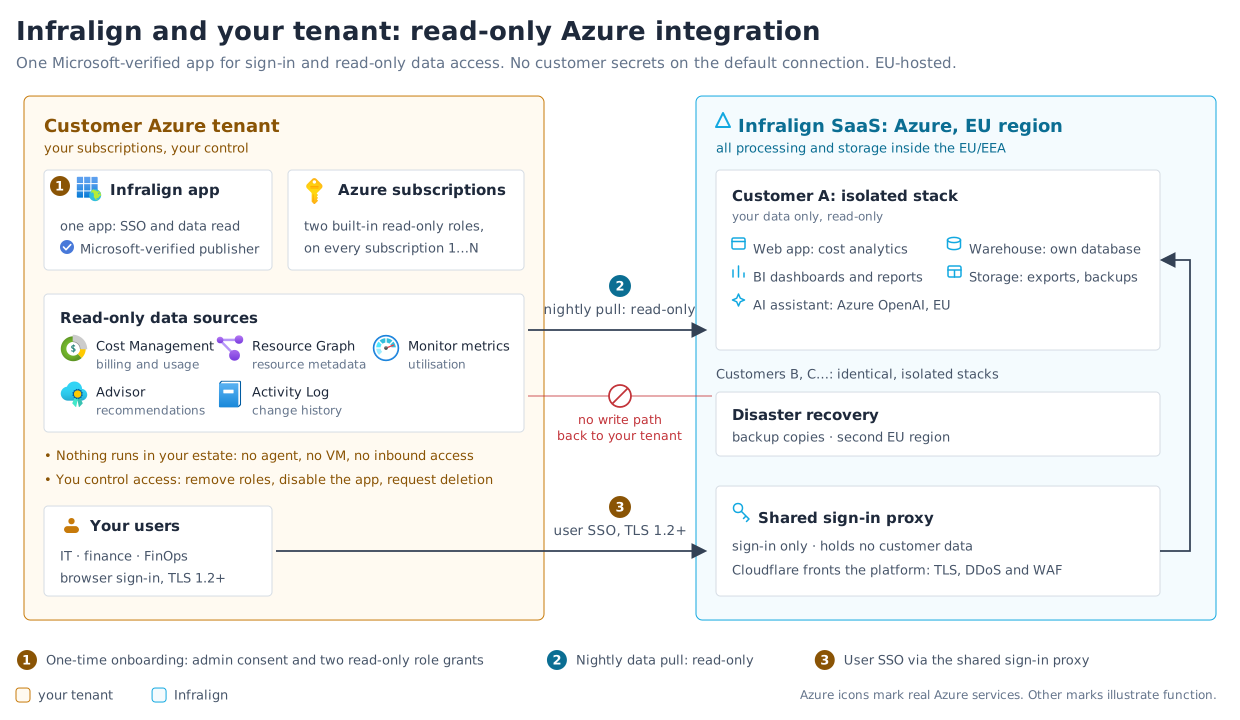
One Infralign application does both jobs: your people sign in through it, and the nightly run reads your cost data as it. You grant it the admin consent and the two read-only roles. See connect Azure for the detail.
What you need, and how long it takes
Section titled “What you need, and how long it takes”This block is the canonical one. Every other page that states a setup prerequisite or a setup time links here rather than restating it, so there is one number to correct if it ever changes.
- Who accepts the consent: any one of Global Administrator, Privileged Role Administrator, or Cloud Application Administrator. Not a Global Administrator only.
- Who assigns the roles: Owner or User Access Administrator on the scope you choose.
- In many organisations these are two different people. Find both before you book the time. Nobody needs permission to register applications.
- How long: About 15 minutes at the keyboard, and about 30 minutes elapsed, including the waits. The consent wait and the propagation wait overlap, so neither blocks the other.
| Part | Time |
|---|---|
| The consent answer, when somebody else approves it | Minutes to days. Send the request first, it is the only step that can queue |
| The two role assignments | About 5 minutes with the wizard's Cloud Shell script at any scale, or about a minute per assignment in the portal |
| Azure role propagation | A wait of up to about 10 minutes |
| The wizard's own steps | About 6 minutes |
Figure 1 is the whole arrangement. Steps 1 to 5 are yours. Steps 6 and 7 are ours.
Consent
Section titled “Consent”1. Send the consent request. This is the one step that can sit in somebody’s queue for days, so send it first. Email your approver your tenant ID and a link to grant admin consent. That page has them build the consent URL themselves and make four checks before they accept.
2. Your approver accepts the consent dialog. A few minutes of their time, once per tenant, never per user. Everything the dialog asks for is a sign-in permission. Accepting is also what makes Infralign appear under Enterprise applications in your tenant, which is the identity step 3 assigns the roles to. The four checks they make.
The wizard, and the roles it hands you
Section titled “The wizard, and the roles it hands you”3. Open the setup wizard at app.infralign.ai and go as far as its Roles step. The wizard’s Roles step is where the role-assignment script comes from, so open it before you brief your role assigner. This step used to sit after the role assignment, which asked you to run a script that had not been generated yet.
Nothing is committed by looking: the wizard stores nothing before its final Confirm step. The wizard steps.
4. Assign the two reader roles. Grant Reader and Cost Management Reader to the Infralign enterprise application, at management group scope if you can. For one or two subscriptions the portal takes about a minute each; for more, hand your role assigner the Cloud Shell script from step 3, in Bash or PowerShell, which covers every subscription in one idempotent run. Then allow up to about 10 minutes for Azure to propagate. The Roles step and what the two roles can and cannot do.
5. Finish the wizard. Back in app.infralign.ai: watch the validation run, pick your subscriptions, and select Finish setup. About 6 minutes. The wizard has no credential step, so you paste nothing beyond your tenant ID.
The first run
Section titled “The first run”6. The first nightly run lands your cost data, between 02:30 and 06:15 UTC. Automated. Nothing for you to do.
7. We open your dashboards. Infralign checks that first run. Once it has landed, your dashboards open within one business day, and a person at support@infralign.ai emails you. What to check on your first day.
If you get stuck
Section titled “If you get stuck”Most failures are a role that has not propagated yet, or consent that has not landed. Start at the troubleshooting table. If it does not name your symptom, email support@infralign.ai.
Next: Dashboard sign-in.